Monday, November 30, 2009

Cookies with a Twist

Today marks the LAST day of NaNoWriMo - National Novel Writing Month and the focus of this month's Fancy Flours Cookie Cutter Challenge. My friend, Susan, will be the recipient of this month's cookies, as she was brave enough to join me in undertaking this crazy adventure. Write 50,000 words in 30 days.

The rules of our cookie cutter challenge are simple. At the start of each month I announce an occasion we will celebrate. Readers visit Fancy Flours to vote on one the 600+ cookie cutters featured on their website. I then incorporate the winning cookie cutter into our celebration. You spare me no mercy, typically picking cookie cutters totally unrelated to my celebration.

I gave this month's entry a little "twist" that I think you will find perfect for the holiday season.
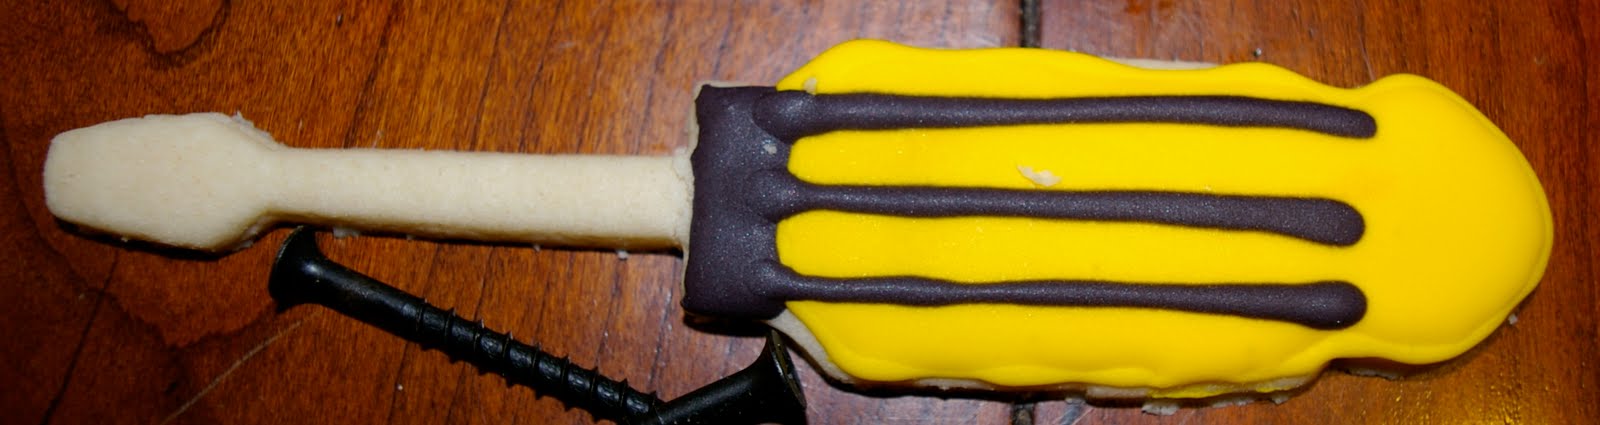
We'll call this month's entry... Can We Build It? Yes We Can! Getting 50,000 words on paper is only the foundation of building our best selling books. I used the screwdriver cookie cutter as the inspiration for my Book Writer's Tool Belt. Inside are all the "tools" Susan will need to begin editing her masterpiece.

Check out what I've included: a small book of daily inspirations for writers, red pens, a gift card for a cup of inspiration, post it notes, chocolate, aspirin, a small gift card for the ultimate book lover, and of course a batch of my yummy cookies.
And, because packaging is everything, I gathered all of her items together in a $.77 tool belt from Lowes.
Here's the "twist" that I think you will like. You could create a Tool Belt for just about anyone on your holiday list. Know a Scrapbooker? What about paper, scissors, stickers, glue, and a hole punch?

Know someone who interested in sprucing up his apartment? How about paint swatches, a picture frame, a decorating-for-dummies book, and a gift card to a local accessory store?

Ice cream lover? Sprinkles, an ice cream scoop, a gift certificate to Baskin Robbins, sugar cones, ice cream spoons, ice cream stickers, and cherries for on top?

Fore! How about a golfer? Golf tees, score cards, a golf towel for his bag, golf balls, ball markers, and new spikes for his shoes.

One more. This is fun.

Sewing. Needles, thread, scissors, a new pattern, a pin cushion, and a gift card for fabric.

Cake decorating, fishing, knitting, hunting, fitness, cooking, coffee lover, tennis, guitar player, or gardener. We could go on for days! This is a fun, fun way to package just about any present you have in mind.

The screwdriver cookie cutter is icing on the cake, regardless of your tool belt theme. Just add a tag reading, "Cake Decorating with a Twist," "Building the Ultimate Scrapbook," or "The Nuts and Bolts of Golf." There's a slogan for whatever belt you create.

Win today's cookie cutter by suggesting yet another hobby for which you could stuff a tool belt and tell us which items you might include. Submit an idea in the comment section and your name will go in the construction hat for a drawing to be done tonight at 9:00 p.m.

Signing off until tomorrow when we select the cookie cutter for December.

Saturday, November 28, 2009

Yellow Envelope Project: Noah

A minor adjustment to what is quickly becoming a favorite weekly ritual of Highlowaha. Normally our community comes together on Saturdays to participate in the Yellow Envelope Project. The project is our attempt to recognize someone whose small acts makes their community a brighter place.

Not so today.

About ten days ago, Matthew, Jack and I went to Hallmark to buy a Christmas card for Noah Biorkman, a five year old boy who I learned about through another Highlowaha reader. Stacie forwarded a link telling of Noah's battle with Stage IV neuroblastoma. His parents were asking people from around the country to mail Christmas cards to Noah early, since there was a chance he would not make it to Christmas.

We should have sent the card the day we bought it, but Richard was out of town and nights are always more hectic when he is gone. Then I got busy with family... and life... and daily posts for Highlowaha.

Then came Thanksgiving and all the preparation that goes into hosting guests. And then, yesterday. Well, yesterday I had to go Christmas shopping. Right? Because gosh, what would happen if I stopped long enough to consider, while I am out deciding between Legos and Transformers, that there was a family in Michigan clinging to every last, precious moment they were given?

Last night I finally made time for the three of us to send Noah the card we purchased. I pulled Noah's name up on the internet to confirm the mailing address.

Imagine my sadness when I read the most recent headline, "Noah Biorkman Passes Peacefully." As it turns out, Noah passed away on Monday, November 23 in his home. Our singing Christmas card still sits in the Hallmark bag - too mad at myself to do anything with it and too embarrassed to explain to the boys why we can't mail it.

Life is fleeting. I read in the initial news clipping explaining Noah was terminally ill and that cards should be sent before Christmas, in the event he didn't live past the holidays. So what was I thinking and why didn't I send the card right away?

I know why. Because I'm pompous and full of myself. It didn't occur to me that Noah would die before I decided it was time to send his card. I was so busy getting all the "important" stuff done that I let the life of this little boy disappear before my very eyes.

I'm mad and disappointed in myself.

So today. Today, in honor of Noah Biorkman, I would love it if you would send a card to someone who is long overdue for a message from you. You might even already have a stack of unused cards - purchased, but never mailed. If so, perfect. Join the club. Use one of those cards and send it to the person for whom you initially purchased it. And, if you feel like it... put it in a yellow envelope anyway or decorate it with yellow stickers. That will be our secret.

Do it today. Don't wait. Life is fleeting.

Signing off until tomorrow...

Friday, November 27, 2009

Hindsight is 20/20

I hope you had a good Thanksgiving and that everyone is officially ready to roll into the holiday season! I say, "roll," because if you ate what I ate yesterday, then today you are, in fact, rolling!

But first... today is Free For All Friday and we have some voting to do. In the right hand column of our blog, cast your vote for the secret ingredient of your choice (mushrooms v. pineapple), as well as the person you think had this week's winning recipe - Lauren or Kate.

Then...

Check out the post below and get ready to Free For All.

You might remember after Christmas/Hanukkah last year, I asked readers to brain dump all the things they wanted to remember not to forget THIS holiday season. In exchange, I promised to publish your ideas the day after Thanksgiving, helping to assure holiday season 2010 got off to the right start.

Here is what you said in no particular order. Read through and remind yourself - maybe even find a new idea or two.
  • Peggy wants to better organize her holiday decorating tubs. Better labels; similar things stored together; and label the box containing ornament hangers!
  • Cheryl wants to finish her Christmas Countdown Calendar; get Christmas shopping done in July; Host an Open House party; Get decorations and wrapping paper organized; be sure to have mistletoe, so she can chase her sons around the house with it; and maybe have some outdoor decorations.
  • Claudia wants to remember to replace some of the activities on her Twelve Days of Christmas Activity Tree with more simple things like Christmas jokes and puzzles.
  • Katie wants to remember to make Reindeer Food for her student staff and her fellow hall directors.
  • Anonymous suggested not throwing away wrapping paper this year and using it to make gift tags for next year. Simply cut out the images and rubber cement them to bright colored card stock.
  • Peggy added that you could also use old Christmas Cards to make gift tags.
  • Michelle wanted to remember to get a holiday picture taken with her new, five month old, babies. She also wants to figure out a fun way to record their first Christmas.
  • Kat wanted to be sure to remember to do photo Christmas cards this year and to host a cookie exchange with friends. She added that her mother-in-law has a fun idea... she takes a fun photo of everyone she spent Christmas with and then sends it out as a New Year's card!
  • Heather had a long list including items such as: if traveling have family wrap a picture of presents for children and have actual gifts mailed directly to your home; pick up kids Christmas clothes right after the season ends; go see Santa early (TODAY!); take time to stage fun photos with kids in holiday pajamas and cookies.
The idea for last year's post was the result of Matthew receiving Magic Reindeer Dust from a classmate. I loved the idea, but was concerned I would lose or forget it. My idea worked like a dream, because one year later... here is the recipe - safely tucked away in a post from last holiday season.

To make... fill festive cellophane party bag with oats, sprinkles, and sparkles. Attach the following poem:
Magic Reindeer Dust
Come December 24, as Santa flies here from the North,
Here's what you do, it isn't hard.
Just sprinkle this stuff in your yard...
The sprinkles and sparkles draw old Santa near
and oats attract his eight reindeer...
Then just you wait - they're on their way
P.S. Happy Holiday

Magic Reindeer Dust prompted the idea for Snowman Soup. Check it out. To make... combine 1 package hot chocolate mix, 3 Hershey Kisses; 10 miniature marshmallows; 1 candy cane. Place in small ziplock bag or new mug. Attach the following poem:

Snowman Soup
When the weather outside is frightful,
Snowman Soup can be delightful.
May it warm your spirit and your soul
Let it Snow, Let it snow, Let it snow
When you feel a chill or "brrrrrr"
Use the peppermint stick to stir.
Add hot water and sip it slow.
Let it snow, Let it snow, Let it snow!

I, for one, was glad to see this list of holiday reminders. I did not remember the Magic Reindeer Dust idea, but now that I see it again, I will certainly use it as an inexpensive gift for Jack and his classmates (I have another idea in the works for Matthew's class).

If the idea works for Christmas and Hanukkah, could it also work for Thanksgiving? Is there something you wish you would have remembered sooner when preparing for this year's Thanksgiving? If so, tell me before you forget. If I get enough ideas, I will present them next year on the day after Halloween.

Don't like my Free For All topic? Jump in and pose your own.

Signing off until tomorrow...

Thursday, November 26, 2009

Psst...

PaRayde, here! Just hanging out high atop the Macy's Parade. Last year it was Rayflower reminding us of our Thanksgiving traditions. This year it's me....a 200 foot tall floating beacon of shine. See that big smile on my face? That's the helium. When I talk, I sound like a Chipmunks record on 78. For those of you youngsters out there, a record is what we had before CDs. Record players had three speeds. 33 rpms for full size records, 45 rpms for small records and 78 rpms for the really old records. Still confused? Google it or get over it.

Where was I?

Oh yeah, Thanksgiving. I guess we should talk about what we're thankful for. Here are a few things that I'm thankful for:

I'm thankful that somehow, after all these years, Macy's has been able to keep this parade going. Can you imagine how many times a select few Shining individuals have had to convince management that it was more than just a marketing tool and that there was no way to calculate the Return on Investment. How many times has this parade been saved from the chopping block I wonder? Way to go Macy's.

I'm also thankful for the men and women who are in harms way in the military, while we eat ourselves sick, watch football, and try to keep Uncle Mikey from hitting the twelve beer mark before dessert. Semper Shine!

I'm thankful that some Shining inventor came up with the Widget that keeps my Guiness Draught bubbly and fun.

I'm thankful for traffic attorneys that have kept me out of court and out of class. You're worth every Shining penny.

The last thing that I'm thankful for is............

homemade yogurt and granola. You thought I was going to get sappy didn't you? Hah. Never.

So tell me, my fellow sultans of Shine. What are you thankful for?

Wednesday, November 25, 2009

Horn of Plenty


After the success of our paper mache Halloween treats in October, I thought I would take a reader's suggestion and try making a paper mache cornucopia. Then I learned, through my creative sister in law, that I could make an edible cornucopia. Hmmmm.... flour and soggy newspaper or pastry and whip cream? I decided I'd go edible, so today I share a variation of Cassie's chocolate cream-filled dessert. Check hers out by clicking here and then check out mine below...

I am no chef - pastry or otherwise - and even I thought it was super easy.

Purchase Puff Pastry Sheets in the refrigerated section of your local grocery store. I found mine next to the refrigerated Pepperidge Farm Cakes.
Roll tin foil to be cone-shaped. Note: The size of your tin-foil cornucopia will determine the size of the cornucopia you bake. While my sister in-law made each of hers small enough for one per person, we decided to bake two large cornucopias and let the family share one for dessert. I image you might be able to get three or four cornucopia's per Puff Pastry sheet.
Place on cookie sheet and bake according to directions on package - approximately fifteen minutes.
While waiting for the pastry to bake, whip your cream
Slice fresh fruit
Let cornucopia's cool for fifteen minutes then pull tin foil out from center.
Once cooled, fill cornucopia with whipped cream and fresh fruit. Or... vanilla ice cream inside the warm cornucopia could also have been yummy. Either way, this dessert would look great centered on your Thanksgiving buffet!
Dig in!

Now a chance to toot the horn of Highlowaha - specifically Cristine and her friends at Struble Suds. Back in the fall, Struble Suds accepted our Dine By Design Challenge in a big way! They raised $302.00, so we could grant a family a Gift of 218. After some consultation with Cristine, we decided to adopt a family in the Dallas/Fort Worth area for the Thanksgiving Holiday.

Sunday, Heather, Cheryl, and I delivered the packages and, I must say, it felt great. Here's what we were able to do. We filled a basket chock full of things such as a new Thanksgiving table cloth, brass candle sticks, tapered candles, linen napkins, and a $150.00 gift card to our local grocery store, Tom Thumb. In addition, we purchased them a turkey, bought them a turkey platter, and later on today a beautiful arrangement of fresh flowers will be delivered to the family's house!

I'd say together, Highlowaha and Struble Suds, made one family very happy this holiday season.
Good work, everyone.

Don't forget to tune in tomorrow for our Thanksgiving fun.

Signing off until Turkey Day...

Tuesday, November 24, 2009

Dressing the Turkey


Have no fear. Thanksgiving is only a couple of days away, but you still have time to whip up the perfect centerpiece or hostess gift (make it to the end of today's post and discover at least one more fun way you can use the idea being featured today).

Stuff one brown grocery bag with crumpled newspaper (notice my use of yet another brown bag!). Set stuffed bag aside.
Using one package of brown tissue paper, cut into long strips. My package contained ten sheets of paper. I doubled my sheets and then cut them into three smaller strips for a total of 15 strips (10 sheets/by 2 per fold x 3 strips per fold = 15 strips). Holding strips horizontally make 1.5 -2 inch cuts along the full length of each strip. Set aside.
Sketch a turkey head onto orange foam or card stock. Double the foam or card stock, so you have two cutouts (a front and a back). Using a google eye or markers, place eyes on the turkeys head.
Assure the head stands up straight by inserting a dowel or stick between the two sides of the head. Hot glue two sides together.
Insert dowel into the brown bag.
Running the full length of the brown bag, glue strips of tissue paper to the brown paper bag. I used hot glue, because it is faster. If doing with kids Elmer's Glue will work fine.
Slightly overlap strips on top of one another. Repeat on both sides.
Affix strips to top of the bag, carefully working around the turkey's head. Once the sides and top are covered, you should have used 13-15 strips of brown tissue paper.
So far so good.
Cut feathers from fall colored construction paper. I used red, orange, and yellow. Fold bottom about about an inch and add glue.
Attach feather to the turkey's back. Hold in place while glue dries.
Pieces of feathers might need to be glued to one another in order to assure they don't flop to one side or another.
Voila! The turkey is done!
Yes, it would make a cute centerpiece. Yes, it would be super cute "stuffed" with a small house warming gift for your hostess (maybe dish towels or potpourri). But... it could also make a super cute pinata for the kids to break after dinner is over.

Gobble any other ideas?

Signing off until tomorrow...

Monday, November 23, 2009

Buon Compleanno, Fibonacci!

Fibonacci, renown mathematician, would have turned 834 years old this Saturday, November 28. Highlowaha will be involved in our Yellow Envelope Project this Saturday and, since postage for yellow envelopes delivered to heaven are pricier than most of us can afford during the holiday season, we will celebrate Fibonacci today.

Those who know me well are surprised I am making time to celebrate the birth of a mathematician. After all, the more prolific and successful a mathematician is, the more there is for me to learn. Numbers aren't my strong suit and I don't generally look for more reasons than necessary to broadcast my ignor... void.

But.

If listening intently enough, messages - even answers to questions - might be surrounding you.

I could go into great detail about the who, what, where, when, why, and how of my connection to Fibonacci, but I've learned brevity scores more points. Suffice it to say, one month ago you could have told me we were having Fibonacci for dinner and I would have been licking my chops ready for a great Italian meal.

Earlier this month I was reading a book titled, The Think Big Manifesto, by Michael Port. I have big dreams for Shine, Ray Wattson, Yellow Envelope Project, and our Highlowaha community and, The Think Big Manifesto served as a healthy dose of inspiration at the right time. In his book, Port explains,
"To think big is a thing of beauty in keeping with the mathematical code of Fibonacci numbers. I have used its sequence to describe the principles of thinking big. I have another purpose in using this seemingly random numbering. That is, to demonstrate that no one of these principles has a higher priority than another. Rather, each builds on every other one, creating and interdependent web."
That same week I was plotting out upcoming blog topics for Highlowaha and, as usual, consulted the web for a calendar of fun dates. Fibonacci's birthday was listed. One week earlier and that date would have meant nothing to me and, instead, today we would be talking about dressing your turkey.

Click here if you want a credible explanation of Fibonacci's code. Otherwise settle for the remedial and perfectly parochial point I hope to make.

Fibonacci's code is like nature's numbering system. His numbers, in sequence, appear everywhere in nature, from the leaf arrangement in plants, to the pattern of the florets of a flower, the bracts of a pine cone, or the scales of a pineapple, and on and on and on. WOW! Method to the madness? Really, who knew?

How many times have you looked at a pine cone, a sea shell, a pineapple, a strawberry, or a daisy and taken their beauty or symmetry for granted? For me, far too many!

But.

The realization there is a code helping explain what I suddenly realize are perfect patterns to simple things, such as pine cones and daisies, is not only inspiring, but also comforting.

Inspiring because, it seems, there is no way such a thing good be accidental or coincidental. Comforting because, I think it means there is a natural order to things and that that order is far stronger than any of our human attempts to control the world around us.

Fibonacci's Code is my reminder that, if I simply plow forward, living each day with purpose and offering up what I have to give the world, eventually a sequence of contributions will emerge, every bit as beautiful as the seashell, the flower, or the pine cone.

How about you?

Consider leaving your home today in search of a pine cone. Bring it home and spend some time studying the wonder that is Fibonacci's Code. Then imagine - maybe even journal - what that very same code might mean for you.

I'd love to hear your thoughts.

Signing off until tomorrow...

Saturday, November 21, 2009

Yellow Envelope Project: Ohio

The older I get the more aware I am of the fragility of life.

That's why, six days before Thanksgiving, I pick this nominee to be the recipient of this week's Yellow Envelope Project. I render myself lucky and maybe you do too. Everyone who was in my world last Thanksgiving is still here this year. I know that won't always be the case, but I am appreciative for each year I get to squeak by with the comfort of status quo.

We can't eliminate the sadness our nominee feels, but after giving so much to so many, maybe we can add a little "shine" to his Thanksgiving.
Years ago, Guy and Ginny were my youth group leaders at church. They were always there for kids who where having problems, as well as giving us a fun environment without being preachy or condescending. I will never forget those years with them. Last year Ginny passed away due to cancer and Guy is still trucking. I recently ran into him at a fundraiser for the current youth group and, while he was there helping those kids, he's not the same Guy. He spent so much f his life giving to the kids of the church and made so many of them shine.
Participate in our Yellow Envelope Project by sending a short note to the man whose address is listed below. Put it in a yellow envelope or decorate your white envelope with yellow markers and stickers. And, be sure to write "Yellow Envelope Project" in the return address.

Let Guy know that, the selflessness of giving to others, despite his own sadness, not only makes him shine but, in fact, lights up in his corner of the world.

Guy
8928 Deep Forest Lane
Dayton, OH 45417

Signing off until Monday...

Friday, November 20, 2009

Pucker Up

Is it too early to talk about Christmas decorations? I mean, all the retail stores started putting their stuff out before Halloween so, do you hold a firm position that you will not think about Christmas decorations until after Thanksgiving?

If that's the case then you can gather up your supplies and make this after you've stuffed your faces with turkey and fought the Black Friday crowds. Oh, I do hope you will open your hearts to today's crafty project because I have been waiting and waiting to share it with you and I can't wait anymore!

You may or may not know this about me but I'm a blog addict. There I said it. I'm not trying to recover from it. I embrace it. And, I steal all of their great ideas. (Insert evil laugh here.)

Okay, not really steal because I am giving them credit. And they put it out there for us, right?

Brief background. This past summer I saw a Pomander Ball on a design blog. There was more than one and they were so beautiful. I googled "How to make a pomander ball" and watched a video. I was in love but really, I don't have a reason to make a Pomander Ball with real flowers on my budget. Pfft!

Then, the wonderful folks at Once Wed shared a tutorial on this Pomander Ball and my dream was alive once more! This I can do. And it won't die. And while there's is beautiful all in brown, I really wanted to see it as mistletoe so I can chase my boys around with it and kiss there sweet little faces. Or, maybe you're just one of those lucky types that will just be able to stand under it whenever you want your sweety to kiss you.

Let's get ready to pucker up, shall we?

Gather your items:
5" Styrofoam ball
roughly 7 yards of seam binding (or ribbon or fabric)
roughly 4 pages of 12"x12" of card stock paper (I used two different colors. The light green was a glitter page. The dark green was just a regular textured page.)
A flower punch
Straight pins with the round heads on them. I lost count but I used somewhere between 140 - 150.
A ribbon
Scissors

Punch about 70 flowers from each of your card stock colors. Just consider it a little arm workout. Set them aside.

Take your Styrofoam ball and your binding and start wrapping around the ball. Secure it with a pin. It's a bit tricky at first. You have to figure out a criss-cross pattern but it will probably be easy for you.

I left a little seam binding at the top but wished later I had left one fluid piece that you use to hang the ball with. Just pin it in place.

Now the fun part. Take a flower of the dark green paper and a flower from the glitter paper and thread them on to the straight pin.

Then stick that into the Styrofoam ball. As instructed I started in the middle and made a line around the ball but I think if I do it again I might start at the bottom and work my way up so the bottom is really full.

I placed my flowers pretty close together. I wanted it to be full. I may have used more than 140 flowers. I lost count.

Once I got the ball full of the flowers, I adjusted the flowers so that the petals were offset and stuck a second pin to keep them from moving. This is where we go astray from Once Wed's design. Mistletoe has lots of white berry's. I added three large pins in some flowers and 2 large and one small in others. Willy nilly, all random like.

Ooh! Isn't it pretty? Take your ribbon and make a bow. Attach the bow to the top. Just tie it on.

Hang it and stand other until someone gets the hint.

Maybe I need to make a 3" mistletoe ball and whip it out when I see someone cute. That doesn't scream desperation, does it? You could do this for any special occasion you're having. A baby shower with pinks or blues; Reds for Valentine's; Pastels for Easter; Wedding showers in the brides colors.
Okay but wait. Today is your lucky day. They're so easy to make I'm giving this one away. One entry per person. All you have to do to enter is to go to the comment section and tell me this:
Describe your favorite kiss.
All entries should be entered by 8:00 pm CST, Saturday, November 21st. The winner will be announced on Monday.
Snack Throwdown Updates:
We begin voting today for our favorite dish in the Tortilla Challenge. And Katie has the poll up for voting for the next ingredient. And, I trust my HLA team will correct me in the comment section if I'm wrong.
Signing off until tomorrow....

Thursday, November 19, 2009

Talking Turkey


Guest writer Robin Weiss here! Our family loves a good challenge! When we saw the amazing pumpkins and Jack-o-lanterns that we could make after attending the Taste of USA in Kentucky, we figured we could turn it into something else. After much thought and discussion with my helpful designers (age range 4-9) we finally had a plan! Here is how you can construct your very own turkey!

Using blown up and tied water balloons, take a mixture of flour and water to create a paste that will help adhere strips of newsprint to your balloon. This is the first step. The flour and water should be mixed together until it is about the consistency of regular glue. Dip the newsprint, preferably the non printed variety, into the flour and water and begin making layers over your balloon. The more layers you do, the longer it will take to dry and the sturdier it will be. We let ours dry overnight, but it would have probably been ready in about two hours.Gather your supplies for the making of the turkey. You will need: brown tissue paper, scissors, yellow and red felt, a brown fuzz ball, construction paper in various colors, pen/pencil, wiggly eyes, glue dots, foam brush, modge podge and orange foam.

Using the scissors cut the tissue paper into small parts. Begin gluing using the foam brush and modge podge. The more layers, the darker the color. For a more realistic look, try to overlap and vary how you lay the tissue paper on your turkey body. Let this dry as you prepare the turkey head.
We used glue dots to attach the wiggly eyes of our turkey. You need to be sure to place them far enough apart that you can still fit the turkey nose. For the beak/nose, we cut a small square out of the yellow felt. Bending the back edges together, allowing the front to form a beak, we used one glue dot to hold the edges together and one glue dot to adhere the beak to the turkey's face. Then we cut out a red squiggle for the neck of the turkey.

The hard part was deciding how we were going to adhere the head of the turkey. Our original plan was to use popsicle sticks to attach the head we'd just made. Though our sticks were too short or our turkey was too tall to make this work. The shape of the balloon had actually given us a rather small opening, so we were able to cover the opening and rest the head just on top of the turkey. You are still able to fill it with goodies.
For the feathers we traced a hand and cut out two handprints of three colors for a total of six feathers. These were attached to the body of the turkey with the glue dots. The base was actually a piece of orange foam, cut to resemble turkey feet as best we could manage. As we were doing the tissue paper, we had flattened the base of the balloon just slightly while it was damp to allow the turkey to stand up.

To use your turkey as a name badge holder, you can simply attach name cards with glue dots at every seat. You could also use chenille sticks to create "arms" and place different gratitudes that can be changed out. We are so thrilled with our turkey and can't wait for him to be the centerpiece next week at dinner!

I can't see what else you have made with your original designs!

Signing off until tomorrow...

Wednesday, November 18, 2009

Psst... It's That Time

Newcomers to our site are in for a treat.

Like all thriving communities, Highlowaha has it's own set of traditions and rituals. You will have to keep coming back to discover them all, but today you gain insight into one of our many.

On the 18th day of each month we gather in community to share last month's high (best thing), low (worst thing), and the aha (thing you learned). You might recognize the words "high," "low," and "aha" from our blog's title, since the origin of our blog's name is based on this nightly family ritual. Click here to learn more.

This monthly commitment of sharing reminds readers of the discipline required in carving out time for life's simple pleasures - a core value of our blog and our blog's purpose.

Here is how it works. I get us going and then each of you visits today's comment section to share yours. Participate and get your name entered in a drawing for the Ray Wattson shirt of your choice. Visit the GalleRay to see the myriad of choices. Too fashionable for a t-shirt? Give us the name of someone who shines and we will surprise him/her with a Shine shirt - compliments of you!

High: Eighteen days into writing my book and I am still on track with my word count; The weather in Grapevine has been beautiful for most of November; Once again, the way I spend my days is 100% in alignment with who I want to be. It feels good; Time with friends; Finally, finally, finally I got squared away with all the bazillion packages I am supposed to have sent Highlowaha readers. (Kat, Peggy, Robin, Brian, and many more... there are packages on the way to you!)

Low: Richard traveled a lot in the past month; I got very behind in sending out Highlowaha packages and it makes me feel slack; I got a ticket for going 27 in a 20 mile an hour school zone, WHILE talking on my cell phone. Cha ching!

Aha: Writing a book is laborious, taking me about three hours to write 1,700 words.

That's it for me. See you in the comment section, where I hope you will share yours.

Signing off until tomorrow...

Tuesday, November 17, 2009

Over the River and Through the Woods...

...to grandmother's house we go. Nine days and counting until Thanksgiving!

Today's post is dedicated all those brave souls who will be traveling by car or plane with young kids.

Confession.
I have a hard time throwing away paper towel rolls. They are fun-shaped and made from cardboard sturdy enough it seems that there ought to be life after dispensing paper towels. I have the same problem, by the way, with toilet paper rolls.

About a year and a half ago I did a post using toilet paper rolls to make beachy napkin rings for Matthew's birthday party. Today, paper towel tubes are center stage. With just a little effort on your part, paper towel rolls make the perfect Trip Tubes. Check it out...

Using the same technique I used when making a pinata for Matthew's teacher, crumple small pieces of tissue paper into round balls. Adhere balls to the paper towel roll using Elmer's Glue.
Fill tubes with items children can use to entertain themselves while sitting in the car or on a plane. Items I included were things such as crayons, coloring book pages, Mad Libs, toys cars, finger puppets, a miniature Magic 8 Ball, and countless other items stocked in the party section of Target, Walmart or your favorite dollar store.
Once chock full of treats, seal the ends. Guaranteed to make for an AMAIZING trip!
Or, how about wrapping the tube in a map and attaching a note wishing, "Happy Trails"
Or even wrapped in red paper with a wish for a"Dynamite Trip."
Now it's your turn. What other ways can we wrap these paper towel rolls to make for fun themed Trip Tubes? And, while you are at it, how about helping us generate other interesting items we might include in our tubes.

Signing off until tomorrow...